Entries get all the attention, so here are four day trading exit rules to test against whatever
entry you already have. Same entry, different exit, is one of the most informative experiments you
can run — and usually more informative than any entry tweak.
1. The four variants
# 1. Fixed target and stop
if ProfitPct >= 2.0 or ProfitPct <= -1.0:
    Sell()
# 2. Add a time exit — cuts the dead trades
if ProfitPct >= 2.0 or ProfitPct <= -1.0 or HoldTime >= 1200:
Sell()# 3. Give-back protection — exit if it retreats far from the peak
if ProfitPct >= 3.0 or ProfitPct <= -1.0 or HoldTime >= 1800:
Sell()
elif MaxProfitPct >= 1.5 and ProfitPct <= MaxProfitPct - 1.0:
Sell()# 4. Break-even stop after it works
if ProfitPct <= -1.0 or ProfitPct >= 3.0 or HoldTime >= 1800:
Sell()
elif MaxProfitPct >= 1.5 and ProfitPct <= 0.1:
Sell()
2. What each one is actually for
Variant
Adds
What it fixes
What it costs
1
nothing
the minimum viable exit
a flat trade holds a slot forever
2
time exit
dead trades that neither win nor lose
occasionally exits just before it works
3
give-back
a winner turning into a loser
takes you out of trends early
4
break-even stop
the losing half of a trade that once worked
a large crop of exactly-zero trades
Variants 3 and 4 are where most people go wrong, because both feel like risk management and both
cut winners. We tested this properly on our own crypto model and every "smarter" exit we tried was
worse than a plain time exit — they clipped the winners, and the winners were carrying the result.
3. Why the time exit is the one that always earns its place
A position that neither wins nor loses is invisible in a report and expensive in practice, because
it is occupying capacity. If your engine holds ten positions and two of them have been flat for
forty minutes, you are running an eight-position strategy without having decided to.
That is a capacity cost, not a P&L cost, which is why it never shows up in a single-symbol
backtest and shows up immediately in a portfolio one.
4. What the round trip asks of it
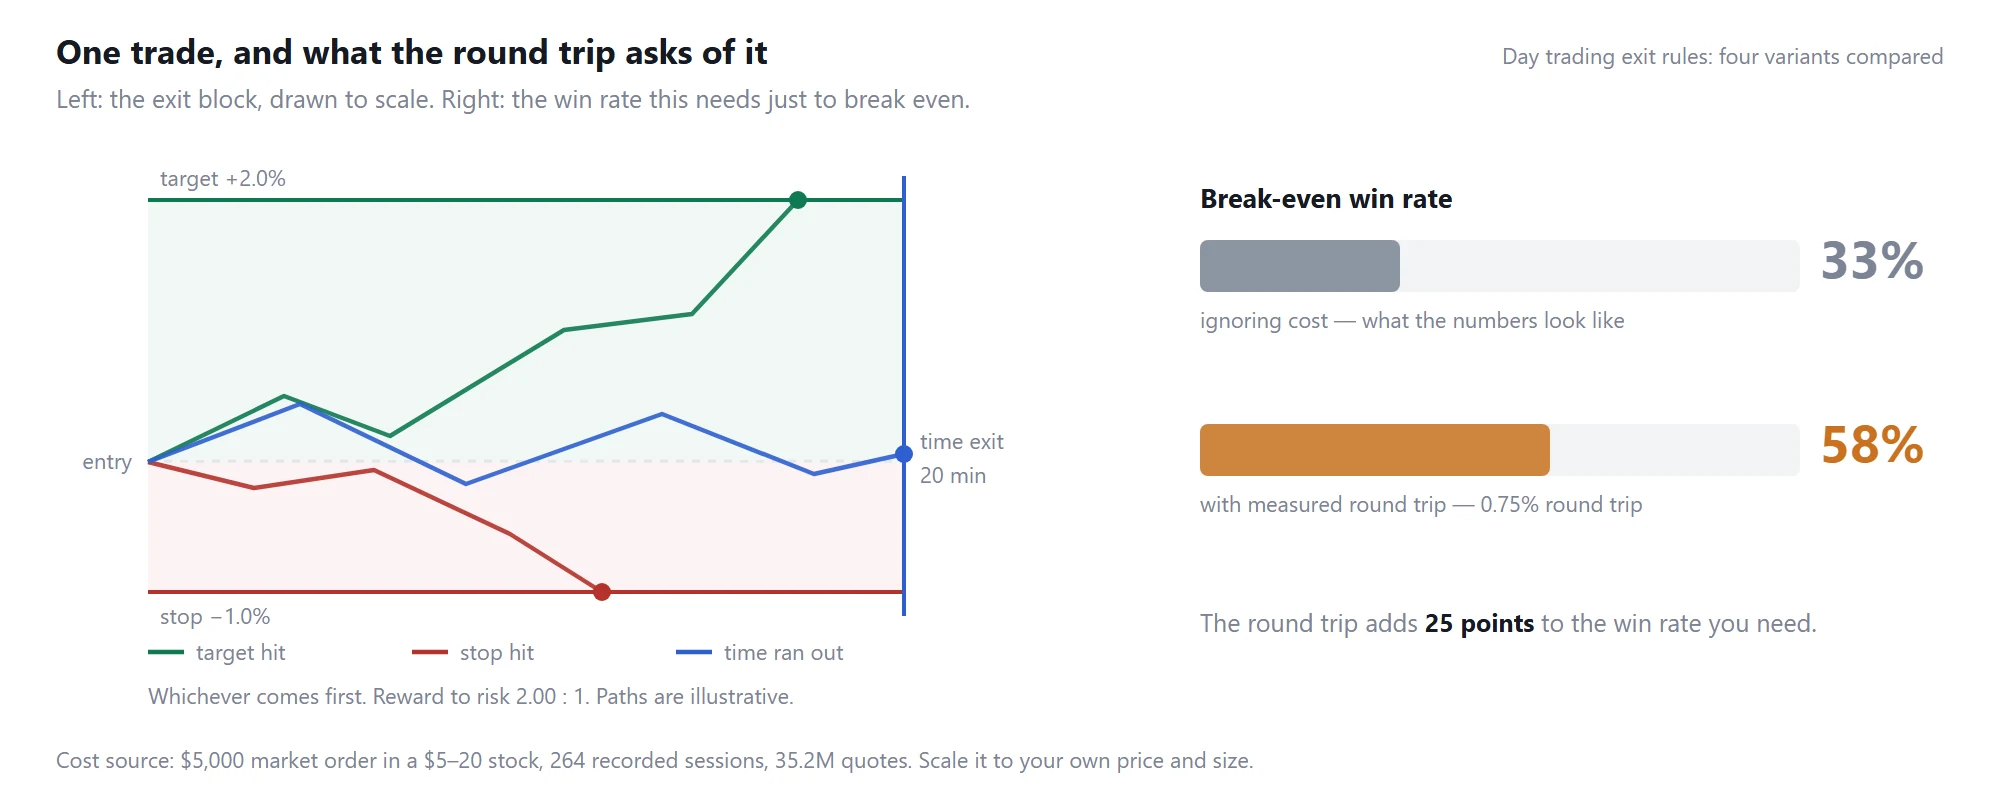
Four exit variants: variant 2 drawn to scale, and the break-even win rate before and after measured trading costs
Drawn above is variant 2. A 2.0% target against a 1.0% stop needs a 33% win rate on paper and
58% once the measured 0.75% round trip is included
(what day trading a US stock really costs).
This is the lens to compare the four through. Variant 3 raises the target to 3.0%, which lowers the
bar to around 50% — but only if the give-back rule does not close you out before you get there.
That trade-off is measurable on your own data, and it is the actual experiment worth running.
5. How to run the comparison
Hold the entry fixed and change only the exit. Record trade count, win rate, average hold time and
the distribution of exit reasons for each variant — that last one matters most. If variant 3 closes
80% of its trades on the give-back branch, it is not the exit you thought you wrote.
Run all four on your own recordings:
how to backtest a day trading strategy on US stocks.
Educational template for research and backtesting. Not investment advice and not a signal service.
Originally published by TraderWe on May 26, 2026. You may quote and link to this page. Republishing the full text without a link back to the original is not permitted.
One caution before anyone runs these: keep position size identical across all four or the comparison means nothing. Same entry, same size, only the exit changes. That's the whole point.
Nice to see a template where the indicator count is zero. Though I'll point out variant 4 is just variant 3 with a meaner giveback rule, and I've never seen a breakeven stop that didn't stop me out right before the real move.
The interesting part for me is that variant 4 removes the decision. When I'm sitting there manually watching a winner fade, I'm not analysing, I'm just anxious. Rita, did having the rule written down actually calm you, or did you still fight it at first?
MaxProfitPct is peak since entry on that position, not the session. It resets each new trade. So in variant 3 the elif only arms once you've been up 1.5, then it fires if you slip a full point off whatever the high water mark was. Worth printing it alongside ProfitPct on a few trades so you can see it tracking.
Ran a breakeven stop for most of a decade and Skeptic isn't wrong, it will pick your pocket on the trades that were going to pay for the month. But the trades it saved me from were the ones I'd have held into the close arguing with myself. Pick your poison and write it down.
- log which condition fired on every exit
- target vs stop vs time vs giveback
- the counts tell you more than the P&L does
- do it before you start tuning numbers
My contribution is the anti-template: I ran variant 3, watched it trigger the giveback rule, and then re-entered manually because I was sure it was coming back. Did that four or five times. Never once thought about whether the rule was right, just kept overriding it. If you're going to test these, don't be me — let the thing finish the trade.